 Skip to content

The Art and Science of Leather Tanning: How Hides are Transformed Into Beautiful Leather

Tanning Meaning
Tanning is the most essential part of the production of leather.The term tanning refers to treating animal skins and hides to make them soft, pliable, durable, and resistant to rotting. This process makes leather suitable for clothing, footwear, accessories, etc.
A tannery is a place in which the skins are processed. In most cases, the tanneries are located near slaughterhouses because the hides must be sent for processing. However, some tanneries exist independently of the slaughterhouse. These independent tanneries perform the same functions as those associated with the slaughterhouse. They receive the skins from nearby farms and butchering facilities and treat them according to the product's specific requirements.
Before tanning, the skins undergo several operations. First, they are detailed, degutted, and washed to remove dirt, hair, fat, blood, oil, and grease. Then they are drenched in hot water for about four to eight hours to soften the hide. After soaking, the skins are rinsed, salted, and dried. Then they are treated with chemicals to remove surface oils and fats and to prevent bacteria growth. Finally, the skins are tanned to harden the hide.
After the hides are tanned, they are usually cut up into pieces and packed in barrels. The finished products include shoes, gloves, belts, jackets, hats, luggage, saddles, and other items.
Brief History About Leather Tanning

The earliest known evidence of tanning dates back to 2000 BC in Mesopotamia. In Ancient civilisation, Egyptians used animal hide to make clothing, shoes, and furniture in ancient Egypt. They also used the bark of trees like acacia, tamarind, cedar, and sumac to produce dyes, paints, and varnishes.
In ancient Greece, people wore leather garments and footwear. Leather was also used to manufacture shields, spears, swords, helmets, armour, and vessels such as amphorae.
The Roman Empire produced leather goods for civilian and military purposes. For example, leather gloves were worn by gladiators.
Leather was used extensively in the Middle Ages. During the Crusades, pilgrims travelled long distances over harsh terrain wearing heavy leather coats. Medieval knights often fought on horseback while wearing full plate mail suits. When travelling, horses needed protection against weather and insects. Therefore, leather saddles, bridles, girths, blankets, and saddlebags were developed.
During the Renaissance, leather became fashionable among European nobility. People began wearing fine leather jackets, cloaks, hats, and shoes. Leather was also used for making purses, wallets, and money clips.
How is Leather Made?
Leather is a material that is made from the skin of an animal. Making leather involves three main steps: tanning, drying, and finishing.
Tanning is the process of preserving the skin so that it does not rot. The hide is first soaked in a mixture of water and chemicals. This helps to remove the hair and fat from the hide. Afterwards, The hide is soaked in the second mixture of water and chemicals. This helps to preserve the hide and make it more flexible.
Drying is the process of removing all the moisture from the hide. Next, the hide is hung up in a dry room or an oven, where it will slowly lose all its moisture. Finishing is adding colour or other treatments to the leather to give it the desired supple leather look or feel.
What is Leather Tanning?
Tanning is how animal skins are prepared for use as leather products. Animal hides undergo various processes to make them suitable for human consumption. These include de-hairing, scouring, soaking, salting, fleshing, dyeing, pickling, re-0taining, softening, stretching, oiling, finishing, and drying. Each step affects the final product, ensuring the material is ready for further processing.
The first step in tanning is called de-hairing. This removes the hair from the hide. In some cases, the hair is removed mechanically, while in others, it must be chemically treated. After de-hairing, the hide is soaked in water to soften it. Then it is fleshed out or scraped off the bones. Next, the hide is washed to remove dirt and grease. The next step is salting, which makes the hide easier to work with. Finally, the hide is dyed, bleached, pickled, softened, stretched, oiled, finished, and dried.
Why do We Need to Tan Leather?
As leather is a natural material, it is subject to decomposition. The tanning process preserves leather by making it more resistant to bacteria, mould and insects. In addition, tanning makes the leather more durable and less likely to dry out, crack or tear.
Without tanning, leather would quickly deteriorate, making it unsuitable for use in clothing, footwear, furniture or other products. Tanning gives leather strength and flexibility, as well as water resistance. It also helps preserve the hide's natural oils, which keep the leather supple.
There are several methods of tanning leather, each with advantages and disadvantages. The most common methods are vegetable tanning and chrome tanning. Vegetable-tanned leather is better environmentally friendly than chrome-tanned leather but is less durable and may require more care over time.
Leather Tanning Methods

The main tanning methods are:
(1) Chrome Tanning Method
Chrome tanning process is the most typically used method of tanning. Depending on the type of leather, it produces different colours such as brown, black, grey, red, orange, yellow and white. There are many types of chrome-tanned leather. They differ mainly in terms of how the chrome is applied. Some are chrome plated; some are chrome painted; others are embossed. Leather treated with chrome is usually called "chromium tanned".
(2) Vegetable Tanning Method
Vegetable tanning is the ancient method of tanning. It involves soaking raw hides in a solution containing chemicals extracted from plants like oak bark, sumac, walnut leaves or bean pods. These extracts contain substances that bind to collagen fibres in the hide. After several days, the skin becomes soft and elastic, and the colour changes from light to dark brown.
(3) Semi-Chrome Tanning Method
Semi-chrome tanning combines the advantages of chrome tanning with those of vegetable tanning. It is often used for making gloves, shoes and handbags.
The Tanning Process Explain

Leather tanning is a process that has been used for centuries to preserve animal hides. The process involves soaking the hide in a solution of water and chemicals and then stretching and drying it. The result is a durable, weather-resistant material used to make various products, from clothing to furniture. Tanning is a complex process, but this guide will give you a basic overview of how it works.
Process 1 : Beam House Process
The first phase is the beam house operations. In this step, we prepare the raw material, i.e., the animal hide. We start with cleaning the skin, which includes washing the hide and removing hair. Then, we cut off the head, feet, tail, ears, and nose. After that, we scrape the hide with a knife. Next, we separate the hide into three sections: belly, chest, and legs. Finally, we rewash the hide.
We use hot water and soap to wash the hide. If you don't know what soap is, it's just liquid fat mixed with lye. Lye is what makes the soap bubble up. You can find lye in some stores near the laundry detergent aisle.
Lye is very dangerous because it burns quickly. So, make sure you wear gloves while working with it. Also, make sure you keep away from children. If something happens to a child, they could die.
After the first phase, we move on to the tanning process's second phase. During the tanning process, the chemicals penetrate deep into the hide, making the leather soft and flexible.
Step 1: Curing
The first step in any leather-making process is to stop the hide from decomposing. If it starts decomposing, there's no hope of getting usable leather out. To do this, the hide requires to be preserved. Several ways to preserve hides include tanning, tawing, pickling, salting, and smoking.
Tanning is probably the most common method used today. Tanning involves treating the rawhide with chemicals to make it soft enough to work into the leather. Then, tannins and fats are added to help bind the fibres together.
Tawing is another popular preservation technique. In this case, the hide is soaked in water and then scraped off with a tawer tool. This removes the outer layer of fat and loose connective tissue. After scraping, the hide is often treated with salt to loosen up the fibre structure further.
Pickling is a third option. Pickled hides are soaked in brine and then left to dry. They must be dried thoroughly because bacteria can grow inside the pores of the hide. Salted hides are sometimes pickled too. However, pickles aren't always practical.
Finally, smoked hides are also commonly used. Like pickled hides, they are soaked in salty brine and then hung to dry. Smoked hides are softer than pickled ones but still require thorough drying. There are different methods used to dry leather. We discussed how different methods of drying leather.
Step 2: Soaking/ Washing
The next step is soaking the rawhide in water. You want to do this for about 24 hours. A good rule is adding enough water to cover the hide completely. If you don't have access to an enormous container, use several smaller containers and mix them up. Some people recommend adding salt to the water to help soften the hide. We didn't find much difference in our final product whether we added salt or not.
After soaking, rinse the hide under running water. Then pat dry with paper towels. Make sure to let the moisture drain out completely. Next, place the wet hide into a plastic bag and seal tightly. Place the sealed bag in another larger plastic bag, and tighten the outer bag. Put the entire thing in the refrigerator overnight.
Step 3: Liming
The liming process removes any remaining organic substances on the hide. This is done by treating the hide with lime water containing sodium hydroxide. Sodium hydroxide reacts with the hides protein structure, causing the collagen fibres to break down and loosen up.
This step is critical because it weakens the hide and allows you to remove unwanted parts easily. You want to make sure the hide isn't too wet, though, since excess moisture could cause problems during later steps.
Step 4: Fleshing and Un-hairing
The final step in tanning hides is fleshing out the leather and removing the hair. This is typically done manually with sharp knives and scrapers, though there are now mechanical devices explicitly designed for this purpose.
The flesh is removed by scraping away the outer layer of the hide. Unfortunately, this leaves behind just the softer layers underneath. Scraping is often done with a tool called a "hide hook," which looks like a small pair of pliers. A hide hook allows you to scrape away the flesh without damaging the surface of the leather.
After the flesh is removed, the next step is to remove the hair. Hair removal can be done either mechanically or manually. Mechanical methods include using a machine called a "licker." Lickers are similar to a clothes dryer and work by blowing heated air over the hide. This makes the hair soft enough to pull out easily. Manual methods include using a device called a "skinner." Skinners are handheld tools used to pull hair out by hand.
Once the hair is gone, the hide is ready to dye.
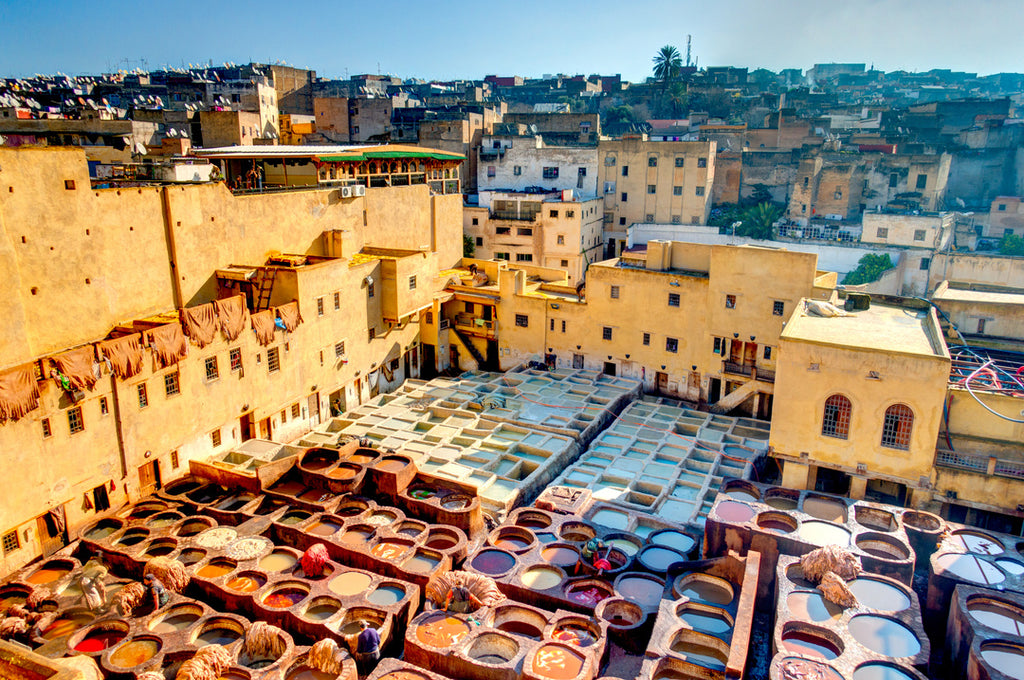
Process 2 : Tanning Yard
The second phase of the leather-making process is the tanning stage. During this phase, the hides undergo a chemical treatment called tanning. Tanning helps make the leather more substantial and gives it colour. As a result, leather is produced during this phase.
Leather is a type of animal skin that has been treated chemically to give it strength and flexibility. Three types of tanning processes produce leather: vegetable tanning, chrome tanning, and sumach tanning. Vegetable tanning uses natural chemicals found in plants like oak bark and tree bark. Chrome tanning involves applying chromium salts to the rawhide. Finally, sumac tanning is done using the leaves of the sumac plant.
The entire process of leather production requires a lot of machinery, tools, and the ability to manufacture finished products. The equipment needed includes machines such as the following:
- A vat – where the hides are soaked in water and chemicals to soften them hides.
- An agitator – to move the hides around in the vats.
- A grinder – to grind up the hides into smaller pieces.
- A sizer measures how much of each hiding piece needs to be processed.
Step 5: Bating
The fifth tanning step involves removing excess lye and salt from the hide. This is usually done in a separate operation called "bating". In bating, the pH of the solution is lowered to about 4.5 - 5.0 using buffers like sodium carbonate and potassium carbonate. These chemicals are added to the solution to neutralize the caustic effects of the lime. After the pH is adjusted, the solution is poured into tanks, where it is stirred continuously. This helps to mix the solution evenly throughout the tank. Then the solution is allowed to settle overnight. During this settling period, the solids form a sludge at the bottom of the tank. This sludge is removed either manually or mechanically. Once the solution is clear, it is pumped out of the tank. The remaining liquid is drained off and stored in another tank.
Step 6: Pickling for chrome tanning only
Chrome tanning is one of the oldest methods of leather processing. It predates both salt and oil tannage. For centuries, tanneries used lime juice to treat hides before tanning. Lime juice contains calcium hydroxide, which reacts with the proteins in the hide to form insoluble compounds called chromium salts. These salts precipitate out of the solution and remain in the finished product as a protective coating.
Modern chrome tanning uses sodium dichromate, a chemical compound containing chromium(III). Sodium dichromate forms insoluble complexes with the protein in the hide, forming a hard surface layer. This layer protects the underlying fibres from further degradation.
The most common type of chrome tanning involves treating hides with water and sodium dichromate. As the pH falls, the reaction occurs. When the pH reaches about 3.5, the tanning agent becomes insoluble. Therefore, the pH level must be raised at this stage to prevent the tanning agent from dissolving the collagen in the hide, making the finished leather weak.
For vegetable leather, pickling does not apply because the tanning process can occur at much higher or more basic PH levels.
Step 7: Tanning
After taking care of every step of preparation, we move on to the next. This includes the process of tanning the hides. There are two primary methods of tanning; the vegetable method and the chrome method. In this article, we will focus on the latter.
The chrome method involves soaking the hide into a solution containing chromium sulphate. The hide gets tanned while being immersed in the solution. When the hide dries out, it becomes dry leather.
Step 8: Drying
Once the hides absorb all the tannin solution needed to dry the leather, there are generally two methods used to do so. One is wringing and squeezing the excess moisture out of each hide with large, heavy rollators. This process takes about 24 hours. The second method uses vacuum suction to suck up the remaining water. Again, this process usually takes 48 hours.
After drying, we move on to the final stage of the tannery process.
Step 9: Splitting
Splitting leather is one of the essential steps in making leather goods. Leather must be thick enough to make items like bags and shoes but thin enough to use for things like belts and wallets. To do this, you need to cut the leather into smaller pieces.
You need to know where to start splitting the leather to achieve the desired thickness. If you don't, you could end up with irregular leather pieces. So, here are some tips to help you out.
Start by laying down a piece of leather over a flat surface. Then, lay another piece of leather directly on top of the first. Now, place a straight edge along the centerline of both pieces of leather. Make sure that the edges of both pieces of leather meet perfectly together.
Next, please pick up the first piece of leather and fold it towards the middle. Repeat this process until you reach about halfway across the width of the leather. Keep doing this until you get the desired thickness.
Now, take the second piece of leather and repeat the same thing. Fold it towards the middle and keep folding until you reach the desired length.
Finally, put the pieces of leather together and trim any excess material.
Process 3 : Retaining
The hide has now reached the third stage – retaining. This final step involves adjusting the leather-based on what you learned during the previous stages. For example, let's say you discovered that your leather was too stiff due to improper stretching. In this case, you would use a softer, stretchier type of leather to achieve the desired effect. Likewise, if your leather had too much moisture, you could add some oil to help it dry out. And if you noticed that the leather was too dark, you could apply a lighter shade of dye to improve the overall tone.
At this phase, you may want to try different types of leather, including suede, nubuck, and even canvas. Depending on how you intend to use the leather, you may choose to work with one or multiple hides. A single hide provides enough material for many projects. On the other hand, if you intend to make shoes, boots, or bags, you may want to buy several hides.
Step 11: Altering the appearance
Altering the appearance of leather isn't anything new. It's been around since the beginning of leather production. But there are several different ways to alter the look of leather. One way is to colour it. There are many types of dyes used to do just that. These include: acid dyes, basic dyes, disperse dyes, reactive dyes, etc.
Another method is to bleach leather. This process removes some of the natural oils and impurities found in leather. After bleaching, leather becomes softer and lighter in colour.
Another popular alteration technique is to dye leather. Water-soluble dyes are usually applied directly onto the surface of the hide. Oil-based dyes are mixed with fat to form a paste and then rubbed into the leather. Both methods produce beautiful colours. However, depending on what type of dye you choose, it will affect the leather's flexibility, softness, or durability.
Step 12: Fat Liquoring
When you want to soften up leather, you apply fat liquors. These are usually oils like linseed oil, tung oil, and vegetable oil. Next, you rub the leather with a brush dipped in the liquid. This softens the leather and makes it easier to work with.
The process takes longer than just washing the leather. But it's worth it because leather gets softer over time.
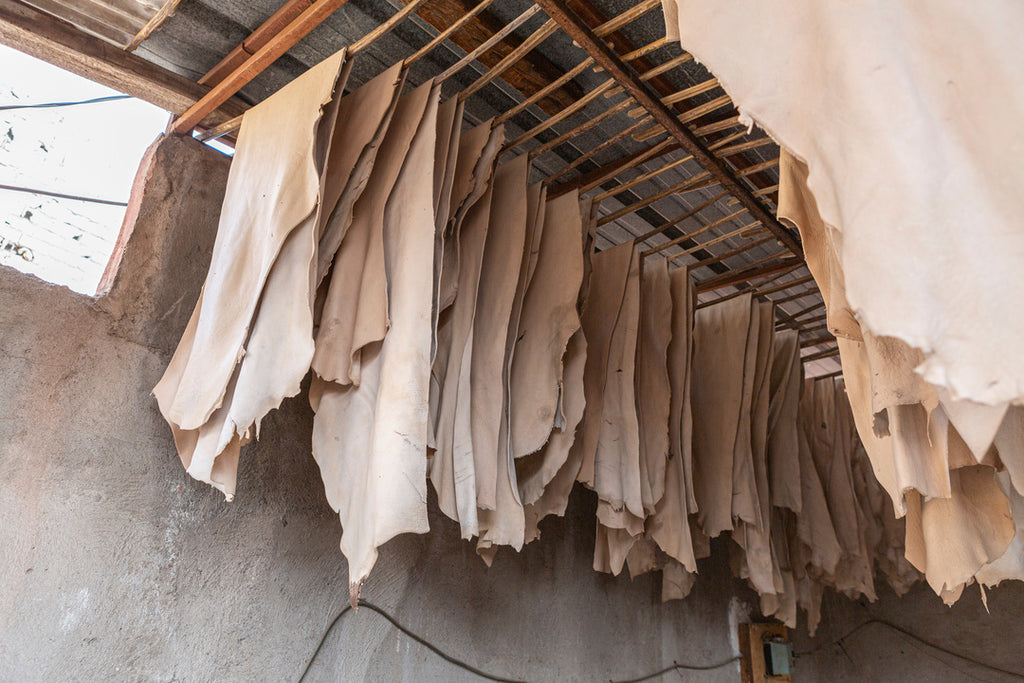
Step 13: Setting and Drying
Leather is finished by setting it out to dry. The usual practice is to allow it to hang free of tension and let the air circulate. This allows the leather to absorb moisture uniformly. If you're working with a hide that has been treated, you might want to stretch it out to help prevent shrinkage.
You can use a hair dryer if you don't have access to a commercial drier. You can also use a vacuum machine to suck up the excess water.
Once the leather has dried sufficiently, it needs to be trimmed down to size and stitched.
Final Phase: Finishing
The end product is what you see on the surface of the finished leather item. A few steps later, we'll talk about how to make sure it looks good once it's done. But first, let's look at the three main phases of the leather tanning process.
The first step is called the tanning process. Tanning is used to give the leather colour, texture, and strength. Leather tanned with chromium sulphate is prevalent because it gives rich brown colour. Other tanning agents include salts of aluminium, copper, iron, magnesium, manganese, nickel, potassium, sodium, zinc, and others.
Once the leather is tanned, it goes into conditioning. Conditioning helps relax the fibres and makes the leather soft and pliable. After it's conditioned, the leather is ready to undergo dyeing.
Finally, the leather gets dyed. Dyes are either natural or synthetic chemicals that add colour to the leather. Natural dyes come from plants, animals, minerals, and even insects. Synthetic dyes are usually petroleum-based and are often referred to as chemical dyes. There are many chemical dyes, including acid dyes, basic dyes, disperse dyes, reactive dyes, vat dyes, and water-soluble dyes.
After the leather is dyed, it's ready to be cut up and shaped into whatever form you want. We'll cover cutting and shaping later in this guide.

What is Re-Tanning
Primary tanning is not always enough to achieve the desired characteristics specified by customers. In this case, it is essential to repeat the tanning process several times. This is called re-tanning.
The tannins used for the primary tanning stage differ from those used for the secondary tanning stages. These tannins affect the feel of the leather and the colour tone. They also influence the dyeing properties and the drying speed.
In addition to the abovementioned effects, the re-tanning process has some additional advantages:
• The amount of water absorbed during the tanning process decreases due to the drying process, resulting in a denser leather.
• The thickness of the leather increases due to the absorption of water.
• The surface becomes softer because the leather absorbs moisture.
• The grain structure becomes finer.
"Real Leather Tanning Process" and "False Leather Tanning Process"
Real leather tanning is a process that has been used for centuries. It involves soaking the hide in a solution of water and tannin, which helps to preserve the hide and prevent it from decomposing. The tanning process also gives the leather its characteristic colour and flexibility.
False leather tanning is a newer process that uses synthetic materials to create a product that looks and feels like leather. False tanning is cheaper and faster than natural leather tanning, but the quality of the final product is not as high.
What is "Natural" Tanning
A natural tan occurs naturally without artificial help. It is also called a sunless tan because it does not use ultraviolet light to produce the colour. A natural tan can come from several sources, including exposure to UV rays in sunlight, exposure to indoor tanning beds, or even exposure to certain chemicals that give off a tanning effect.
The term "natural" tanning often refers to exposing the skin to UV rays in the presence of water. This technique produces a darker tan than a traditional tanning bed or sunbathing. However, there are some disadvantages to this method. For example, prolonged exposure to UV radiation can cause serious health issues such as premature aging, skin cancer, and eye damage.
Another way to obtain a natural tan is through chemical exposure. Some people believe that the chemicals used in tanning products are safe, but many experts disagree. For example, some studies show that tanning beds emit dioxins linked to cancer. Other chemicals found in tanning products could also pose potential risks.
One thing is clear, though: a natural tan cannot be achieved without proper precautions. So if you want a natural tan, ensure you know what you're doing.
Brain Tanning Meaning
Another form of natural tanning is brain tanning. Brain tanning is a process where the brains of dead animals are used to produce leather. In the early days of tanning, it was common practice to use the organic materials brains of cows, sheep, pigs, horses, goats, dogs, cats, and egg yolks. These brains were soaked in warm water and left to ferment for several weeks. After that period, the brains were dried and ground into powder. Next, the powder was mixed with lye solution and put in moulds. When the mixture hardened, it was removed from the mould and allowed to dry. Finally, the leather was treated with oil and salt.
The brains of animals contain high levels of protein, amino acids, and minerals such as calcium, phosphorus, potassium, magnesium, iron, zinc, copper, and manganese. They also contain fats, carbohydrates, vitamins, and enzymes. Because of this, the brain tanning process produces leather with a soft feel similar to cowhide.
Eco Tan Tanning Processes
Tanning refers to the procedure that makes animal skins waterproof and durable. This process is done by soaking the skins in chemical solutions containing salts, acids or alkali. These chemicals react with the proteins contained in the skins to produce bonds that strengthen the material.
The most common tanning methods include dry salting, wet salting, acid treatment, alkaline treatment, enzymatic treatment, and fermentation. Dry salt tanning is one of the oldest known types of tanning. In this method, the skins are soaked in a brine solution for several days and dried afterwards. Wet salt tanning is similar to dry salt tanning except that the skins are dipped into a brine solution and left there for about 24 hours. Acid tanning uses sulfuric acid or hydrochloric acid to dissolve the hair and flesh of the hide to expose the keratin layer. Alkaline tanning involves immersing the skins in a caustic soda solution to soften the outermost cuticle layer. Enzymatic tanning is another form of tanning where enzymes are added to the solution to break down the proteins. Finally, fermentation is a natural tanning technique that occurs naturally during the skin's maturation. The skins are immersed in fermenting liquids such as molasses, wine, beer, vinegar, etc., for several months.
In addition to the tanning mentioned above techniques, there are also other ways to treat the skin. One way is called wet blue and wet white. Wet blue and wet white refer to the use of different kinds of chemicals to change the colour of the leather. For example, some chemicals are placed inside the vat while others are sprayed on the outside. The purpose of this process is to give the leather a beautiful finish. Another type of wet processing is called vegetable tanning. The vegetable tanning process is a process that involves soaking the skins in a solution of plant extracts. Several plants contain substances that will help preserve the skins. Some plants are oak tree bark, sumac, aloe vera, leaves of trees, horsetail, and bamboo; also, they use fish oil. This method has less environmental impact.
Which is The Best Tanning Method?
Regarding leather tanning, several methods can be used by tanning industries. Each method has advantages and disadvantages, so choosing the right one for your needs is essential. Here is a look at the most common leather tanning methods to help you decide which is best for you.
The chrome tanning method is today's most common and widely used leather industry. It produces high-quality leather that is strong and durable. However, it can be expensive and uses harmful chemicals that can damage the environment.
The vegetable tanning method is a more natural way of tanning leather. It uses plant materials to create a beautiful, unique finish on the leather. However, this method can take longer and be more expensive than other methods.
The alum tanning method is another popular option that produces high-quality leather using aluminium salts.
In conclusion, there is no definitive answer to whether the tanning method is best for producing leather. Different tanning methods may be better or worse depending on the specific type of leather tanned, the desired result, and various other factors. Ultimately, it is up to the individual tanner to decide which method will work best for them.
FAQS
1. What chemicals are used in tanning leather?
Various chemicals are used in tanning leather, depending on the desired end result. The most common chemicals used are chromium, vegetable oils, and tannins.
2. How does tanning leather work?
Tanning leather is a process of preserving hides or skins by treating them with tannins. Tannins are acidic compounds that occur naturally in plants. The tanning process makes the leather more durable and less susceptible to decomposition.
3. How to get rid of the tanning leather smell?
There are a few things you can do to get rid of the tanning leather smell:
-Wash the leather with mild soap and water.
-Dry the leather thoroughly.
-Apply a leather conditioner to the leather.
4. What is chromed tanning of leather?
Chromed tanning is a process of tanning leather using chromium salts. This results in leather that is more resistant to water and wear and has a more consistent colour.
5. What oil do they use when tanning leather?
There are a variety of oils that can be used for tanning leather, but the most common is chromatic oil. This oil helps to preserve the leather and keep it pliable.
** Note: The cleaning and leather care tips provided here are general suggestions. It's crucial to consider the specific type of leather and the individual item. For personalised guidance and to address specific concerns, always consult with a professional or refer to manufacturer recommendations. The information offered here is for informational purposes only and may not be suitable for all situations.
